

前言
这两天终于把毕设论文的初稿给搞定了,总算是有了些许的空闲。人一闲下来就想折腾,正好前阵子看到有不少博客都实现了AI摘要,再加上deepseek账户里还有点余额,自然而然地就有了自己实现这么一个功能的想法,顺便继续学习下node js。
后端项目结构
aisummary
├── src
│   ├── config
│   │   └── index.js
│   ├── database
│   │   └── db.js
│   ├── routes
│   │   └── summary.js
│   ├── utils
│   │   ├── logger.js
│   │   └── validator.js
│   └── app.js
├── .env
└── package.json
后端核心代码
db.js
const mysql = require('mysql2/promise');
const crypto = require('crypto');
const config = require('../config');
const logger = require('../utils/logger');

class Database {
    constructor() {
        this.pool = mysql.createPool(config.database);
        this.testConnection();
    }

    async testConnection() {
        try {
            const connection = await this.pool.getConnection();
            logger.info('Database connected successfully');
            connection.release();
        } catch (error) {
            logger.error('Database connection failed:', error);
            throw error;
        }
    }

    generateHash(content) {
        return crypto.createHash('sha256')
            .update(content.trim())
            .digest('hex');
    }

    async getSummary(articleUrl) {
        try {
            const [rows] = await this.pool.execute(
                'SELECT * FROM summaries WHERE article_url = ?',
                [articleUrl]
            );
            return rows[0] || null;
        } catch (error) {
            logger.error('Error getting summary:', error);
            throw error;
        }
    }

    async saveSummary(articleUrl, contentHash, summary) {
        try {
            const [result] = await this.pool.execute(`
                INSERT INTO summaries (article_url, content_hash, summary)
                VALUES (?, ?, ?)
                ON DUPLICATE KEY UPDATE
                    content_hash = VALUES(content_hash),
                    summary = VALUES(summary),
                    updated_at = CASE
                        WHEN content_hash != VALUES(content_hash)
                        THEN CURRENT_TIMESTAMP
                        ELSE updated_at
                    END
            `, [articleUrl, contentHash, summary]);

            return {
                articleUrl,
                contentHash,
                summary,
                isUpdate: result.affectedRows > 0 && result.affectedRows < 2
            };
        } catch (error) {
            logger.error('Error saving summary:', error);
            throw error;
        }
    }

    // 获取文章的更新历史(如果需要的话)
    async getArticleHistory(articleUrl) {
        try {
            const [rows] = await this.pool.execute(
                `SELECT content_hash, content, summary, updated_at
                 FROM summaries
                 WHERE article_url = ?
                 ORDER BY updated_at DESC`,
                [articleUrl]
            );
            return rows;
        } catch (error) {
            logger.error('Error getting article history:', error);
            throw error;
        }
    }
}

module.exports = new Database();
为了减少api的调用,这里使用了MySQL作为摘要缓存。只有当文章内容发生改动或者是有新文章时才会去调用大语言模型。
CREATE TABLE IF NOT EXISTS summaries (
    id BIGINT AUTO_INCREMENT PRIMARY KEY,
    article_url VARCHAR(512) NOT NULL,
    content_hash CHAR(64) NOT NULL,
    summary TEXT NOT NULL,
    created_at TIMESTAMP DEFAULT CURRENT_TIMESTAMP,
    updated_at TIMESTAMP DEFAULT CURRENT_TIMESTAMP ON UPDATE CURRENT_TIMESTAMP,
    UNIQUE KEY unique_article_url (article_url),
    INDEX idx_content_hash (content_hash)
) ENGINE=InnoDB DEFAULT CHARSET=utf8mb4 COLLATE=utf8mb4_unicode_ci;
MYSQL表的创建脚本。
summary.js
const express = require('express');
const router = express.Router();
const OpenAI = require('openai');
const config = require('../config');
const logger = require('../utils/logger');
const db = require('../database/db');
const { validateContent, validateUrl } = require('../utils/validators');

// 创建 OpenAI 客户端
const client = new OpenAI({
    apiKey: config.deepseekApiKey,
    baseURL: 'https://api.deepseek.com'
});

router.post('/summarize', async (req, res) => {
    try {
        const { content, articleUrl } = req.body;

        if (!validateContent(content)) {
            return res.status(400).json({
                success: false,
                message: 'Invalid content'
            });
        }

        if (!validateUrl(articleUrl)) {
            return res.status(400).json({
                success: false,
                message: 'Invalid article URL'
            });
        }

        // 检查数据库中是否存在该文章的摘要
        const existingSummary = await db.getSummary(articleUrl);
        const currentHash = db.generateHash(content);

        // 如果存在且内容哈希相同,直接返回缓存的摘要
        if (existingSummary && existingSummary.content_hash === currentHash) {
            logger.info(`Using cached summary for article: ${articleUrl}`);
            return res.json({
                success: true,
                summary: existingSummary.summary,
                fromCache: true,
                lastUpdated: existingSummary.updated_at
            });
        }

        // 内容发生变化或新文章,需要生成新摘要
        logger.info(`Generating new summary for article: ${articleUrl}`);
        const prompt = `请为以下文章生成一个简洁的摘要,突出文章的主要观点:

${content}

请确保摘要简明扼要,并保持原文的核心意思。`;

        const response = await client.chat.completions.create({
            model: "deepseek-chat",
            messages: [
                {
                    role: "system",
                    content: "你是一个专业的文章摘要助手,善于提取文章的核心内容。"
                },
                {
                    role: "user",
                    content: prompt
                }
            ],
            temperature: 0.7
        });

        const summary = response.choices[0].message.content;

        // 保存或更新摘要
        const result = await db.saveSummary(articleUrl, currentHash, summary);
        logger.info(`Summary ${result.isUpdate ? 'updated' : 'saved'} for article: ${articleUrl}`);

        res.json({
            success: true,
            summary,
            fromCache: false,
            isUpdate: result.isUpdate
        });

    } catch (error) {
        logger.error('Error in summary generation:', error);
        res.status(500).json({
            success: false,
            message: error.message
        });
    }
});

module.exports = router;
一是负责大语言模型的调用,这里用的是deepseek,当然你也可以换成其它的模型,像是阿里的千问之类的。二是负责摘要缓存的调用以及更新。
app.js
const express = require('express');
const cors = require('cors');
const config = require('./config');
const summaryRoutes = require('./routes/summary');
const rateLimit = require('express-rate-limit');

const app = express();

// 从环境变量中读取并解析域名列表
const ALLOWED_DOMAINS = process.env.ALLOWED_DOMAINS
    ? process.env.ALLOWED_DOMAINS.split(',').map(domain => domain.trim())
    : [];

// 域名验证中间件
const validateDomain = (req, res, next) => {
    try {
        const { articleUrl } = req.body;
        if (!articleUrl) {
            return res.status(400).json({
                success: false,
                message: '缺少文章 URL'
            });
        }

        const url = new URL(articleUrl);
        const domain = url.hostname;

        // 检查是否是允许的域名或其子域名
        const isAllowedDomain = ALLOWED_DOMAINS.some(allowedDomain =>
            domain === allowedDomain || domain.endsWith('.' + allowedDomain)
        );

        if (!isAllowedDomain) {
            return res.status(403).json({
                success: false,
                message: '不支持该网站的文章摘要生成'
            });
        }

        next();
    } catch (error) {
        res.status(400).json({
            success: false,
            message: '无效的 URL'
        });
    }
};

// 创建全局限速器
const globalLimiter = rateLimit({
    windowMs: 15 * 60 * 1000, // 15分钟时间窗口
    limit: 200, // 每个 IP 在时间窗口内最多 100 次请求
    standardHeaders: true, // 返回 RateLimit-* 头部信息
    legacyHeaders: false, // 禁用 X-RateLimit-* 头部信息
    message: {
        success: false,
        message: '请求过于频繁,请稍后再试'
    }
});

// 创建 API 特定的限速器
const apiLimiter = rateLimit({
    windowMs: 15 * 60 * 1000, // 15分钟时间窗口
    limit: 100, // 每个 IP 在时间窗口内最多 10 次请求
    standardHeaders: true,
    legacyHeaders: false,
    message: {
        success: false,
        message: '摘要生成请求过于频繁,请稍后再试'
    },
    handler: (req, res) => {
        res.status(429).json({
            success: false,
            message: '摘要生成请求过于频繁,请稍后再试',
            nextValidRequestTime: new Date(req.rateLimit.resetTime).toISOString()
        });
    }
});

app.set('trust proxy', 1);

// 应用全局限速器
app.use(globalLimiter);

// 配置 CORS
app.use(cors({
    origin: config.allowedOrigins,
    methods: ['POST'],
    allowedHeaders: ['Content-Type']
}));

// 解析 JSON 请求体
app.use(express.json());

// 在路由之前添加域名验证中间件
app.use('/api', validateDomain);

// 为 /api 路由应用特定的限速器
app.use('/api', apiLimiter);

// 路由
app.use('/api', summaryRoutes);

// 错误处理中间件
app.use((err, req, res, next) => {
    console.error(err.stack);
    res.status(500).json({
        success: false,
        message: 'Internal Server Error'
    });
});

const port = config.port;
app.listen(port, () => {
    console.log(`Server is running on port ${port}`);
});
主要负责接口的请求限制,域名过滤等,防止滥用。
.env
PORT=3000
DEEPSEEK_API_KEY=
ALLOWED_ORIGINS=*
ALLOWED_DOMAINS=
DB_HOST=
DB_PORT=
DB_NAME=
DB_USER=
DB_PASSWORD=
配置文件,参数作用如下:
PORT是服务运行的端口DEEPSEEK_API_KEY字面意思,deepseek的api keyALLOWED_DOMAINS允许调用api的域名,比如说你的博客,不加的话可能会导致api被滥用DB_HOST DB_PORT DB_NAME DB_USER DB_PASSWORD连接数据库的参数,没啥好说的
前端核心代码
blog-summary-animated.js
(function() {
    // 从脚本标签获取配置
    function getConfig() {
        const script = document.currentScript || document.querySelector('script[src*="blog-summary-animated.js"]');
        return {
            apiEndpoint: script.getAttribute('data-api-endpoint'),
            containerSelector: script.getAttribute('data-container'),
            typingSpeed: parseInt(script.getAttribute('data-typing-speed') || 50, 10)
        };
    }

    // 打字机效果函数
    function typeWriterEffect(element, text, speed) {
        let i = 0;
        element.textContent = "";
        const timer = setInterval(() => {
            if (i < text.length) {
                element.textContent += text.charAt(i);
                i++;
            } else {
                clearInterval(timer);
            }
        }, speed);
    }
    // 修改为自己的接口以及根据实际网页内容修改文章内容选择器
    class BlogSummary {
        constructor(options = {}) {
            this.options = {
                apiEndpoint: options.apiEndpoint || '',
                containerSelector: options.containerSelector || '.joe_detail-wrapper',
                typingSpeed: options.typingSpeed || 50
            };
            this.init();
        }

        async init() {
            this.createSummaryContainer();
            await this.generateSummary();
            this.initThemeObserver();
        }

        createSummaryContainer() {
            const container = document.createElement('div');
            container.className = 'blog-summary-container';
            container.innerHTML = `
                <style>
                    .blog-summary-container {
                        margin: 20px 0;
                        padding: 20px;
                        border-radius: 8px;
                        background: var(--summary-bg);
                        border: 1px solid var(--summary-border);
                        font-family: system-ui, -apple-system, sans-serif;
                        transition: all 0.3s ease;
                    }

                    .blog-summary-header {
                        display: flex;
                        align-items: center;
                        margin-bottom: 15px;
                        gap: 10px;
                    }

                    .blog-summary-icon {
                        width: 24px;
                        height: 24px;
                        background-color: #3b82f6;
                        border-radius: 50%;
                        display: flex;
                        align-items: center;
                        justify-content: center;
                        color: white;
                        font-size: 14px;
                        flex-shrink: 0;
                    }

                    .blog-summary-title {
                        margin: 0;
                        font-size: 16px;
                        font-weight: 600;
                        color: var(--summary-text);
                    }

                    .blog-summary-content {
                        color: var(--summary-text-secondary);
                        line-height: 1.6;
                        font-size: 15px;
                        margin: 0;
                    }

                    .blog-summary-loading {
                        display: flex;
                        align-items: center;
                        gap: 8px;
                        color: var(--summary-loading-color);
                    }

                    .blog-summary-error {
                        color: #ef4444;
                        font-size: 14px;
                    }

                    /* 加载动画 */
                    .loading-dots {
                        display: flex;
                        gap: 4px;
                    }

                    .loading-dots span {
                        width: 6px;
                        height: 6px;
                        border-radius: 50%;
                        background-color: var(--summary-loading-color);
                        animation: loading-dot 1.4s infinite;
                    }

                    .loading-dots span:nth-child(2) {
                        animation-delay: 0.2s;
                    }

                    .loading-dots span:nth-child(3) {
                        animation-delay: 0.4s;
                    }

                    @keyframes loading-dot {
                        0%, 100% {
                            transform: scale(0.3);
                            opacity: 0.3;
                        }
                        50% {
                            transform: scale(1);
                            opacity: 1;
                        }
                    }
                </style>

                <div class="blog-summary-header">
                    <div class="blog-summary-icon">AI</div>
                    <h3 class="blog-summary-title">文章摘要</h3>
                </div>
                <div class="blog-summary-content"></div>
            `;

            const articleContainer = document.querySelector(this.options.containerSelector);
            if (articleContainer) {
                const articleContent = articleContainer.querySelector('.joe_detail__article');
                if (articleContent) {
                    articleContent.insertBefore(container, articleContent.firstChild);
                } else {
                    articleContainer.insertBefore(container, articleContainer.firstChild);
                }
            }

            this.summaryContent = container.querySelector('.blog-summary-content');
            this.container = container;

            // 初始化主题颜色
            this.updateThemeColors();
        }

        initThemeObserver() {
            // 初始检测主题
            this.updateThemeColors();

            // 创建 MutationObserver 来监视主题变化
            const observer = new MutationObserver(() => {
                this.updateThemeColors();
            });

            // 只监视 HTML 元素的 data-mode 属性变化
            observer.observe(document.documentElement, {
                attributes: true,
                attributeFilter: ['data-mode']
            });
        }

        isDarkMode() {
            // 夜间模式检测,根据实际的网站主题修改
            const mode = document.documentElement.getAttribute('data-mode');
            return mode !== 'light';
        }

        updateThemeColors() {
            const isDark = this.isDarkMode();

            if (isDark) {
                // 暗色模式
                this.container.style.cssText = `
                    --summary-bg: #1a1a1a;
                    --summary-border: #333333;
                    --summary-text: #ffffff;
                    --summary-text-secondary: #cccccc;
                    --summary-loading-color: #999999;
                `;
            } else {
                // 亮色模式
                this.container.style.cssText = `
                    --summary-bg: #f8fafc;
                    --summary-border: #e2e8f0;
                    --summary-text: #1e293b;
                    --summary-text-secondary: #475569;
                    --summary-loading-color: #64748b;
                `;
            }
        }

        getArticleContent() {
            const articleContainer = document.querySelector(this.options.containerSelector);
            if (!articleContainer) return null;

            const summaryContainer = articleContainer.querySelector('.blog-summary-container');
            let content = '';

            // 获取文章标题
            const titleElement = document.querySelector('.joe_detail__title');
            if (titleElement) {
                content += `标题:${titleElement.textContent.trim()}\n\n`;
            }

            // 获取文章内容
            const contentElement = articleContainer.querySelector('.joe_detail__article');
            if (contentElement) {
                const elements = contentElement.querySelectorAll('p, h1, h2, h3, h4, h5, h6');
                for (const element of elements) {
                    if (!element.closest('.blog-summary-container') &&
                        !element.closest('.joe_detail__copyright')) {
                        content += element.textContent.trim() + '\n\n';
                    }
                }
            }

            return content.trim();
        }

        getArticleUrl() {
            try {
                const url = new URL(window.location.href);
                url.search = '';
                url.hash = '';
                return url.toString();
            } catch (error) {
                console.error("Invalid URL:", error);
                return window.location.href;
            }
        }

        async generateSummary() {
            const content = this.getArticleContent();
            if (!content) {
                this.showError('无法获取文章内容');
                return;
            }

            const articleUrl = this.getArticleUrl();
            if (!articleUrl) {
                this.showError('无法获取文章 URL');
                return;
            }

            try {
                this.showLoading();
                const summary = await this.fetchSummary(content, articleUrl);
                this.showSummary(summary);
            } catch (error) {
                this.showError(error.message);
            }
        }

        async fetchSummary(content, articleUrl) {
            try {
                const response = await fetch(this.options.apiEndpoint, {
                    method: 'POST',
                    headers: {
                        'Content-Type': 'application/json',
                    },
                    body: JSON.stringify({
                        content,
                        articleUrl,
                        options: {
                            maxLength: 1000,
                            style: 'detailed'
                        }
                    })
                });

                if (!response.ok) {
                    throw new Error('获取摘要失败');
                }

                const data = await response.json();
                if (!data.success) {
                    throw new Error(data.message || '获取摘要失败');
                }

                return data.summary;
            } catch (error) {
                throw new Error('网络请求失败,请稍后重试');
            }
        }

        showLoading() {
            this.summaryContent.innerHTML = `
                <div class="blog-summary-loading">
                    <span>正在生成摘要</span>
                    <div class="loading-dots">
                        <span></span>
                        <span></span>
                        <span></span>
                    </div>
                </div>
            `;
        }

        showError(message) {
            this.summaryContent.innerHTML = `<div class="blog-summary-error">${message}</div>`;
        }

        showSummary(summary) {
            this.summaryContent.innerHTML = '<span class="typewriter"></span>';
            typeWriterEffect(this.summaryContent.querySelector('.typewriter'), summary, this.options.typingSpeed);
        }
    }

    // 等待 DOM 加载完成后初始化
    document.addEventListener('DOMContentLoaded', function() {
        new BlogSummary(getConfig());
    });
})();注意,containerSelector和 getArticleContent() 需要根据你自己的网页结构定制。
调用方式
在网页的head中插入:
    <script src="blog-summary-animated.js的地址" defer="" data-api-endpoint="后端api地址" data-container="你的containerSelector" data-typing-speed="摘要打字速度,越小越快,默认50">
    </script>
其余注意事项
1)如果你的博客使用了https,那么后端也需要使用https,否则无法调用。
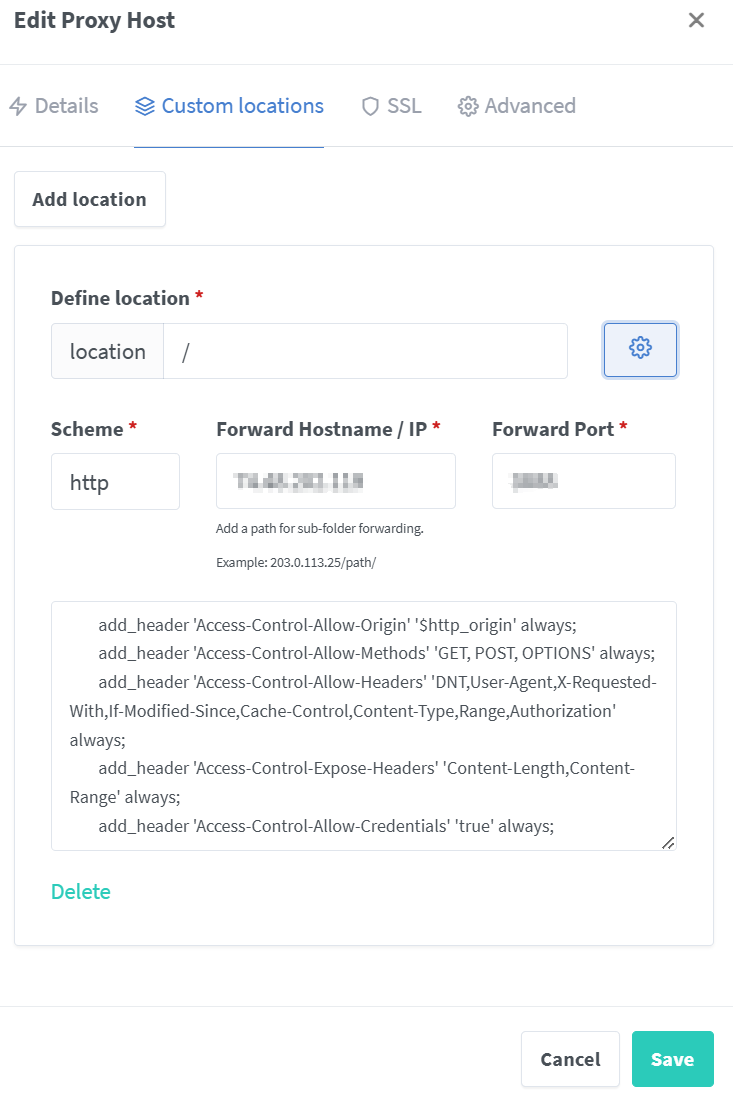
2)如果后端使用nginx反代,则需要在nginx中设置以下代码解决跨域问题:
        add_header 'Access-Control-Allow-Origin' '$http_origin' always;
        add_header 'Access-Control-Allow-Methods' 'GET, POST, OPTIONS' always;
        add_header 'Access-Control-Allow-Headers' 'DNT,User-Agent,X-Requested-With,If-Modified-Since,Cache-Control,Content-Type,Range,Authorization' always;
        add_header 'Access-Control-Expose-Headers' 'Content-Length,Content-Range' always;
        add_header 'Access-Control-Allow-Credentials' 'true' always;
以Nginx Proxy Manager 为例:
效果展示
你应该已经看到了(~ ̄▽ ̄)~
附录1:如何在1panel中部署node js
大家都知道1panel部署docker很方便,其实它部署其他的一些后端服务,比如php,node js,python同样很方便。
如下图所示:
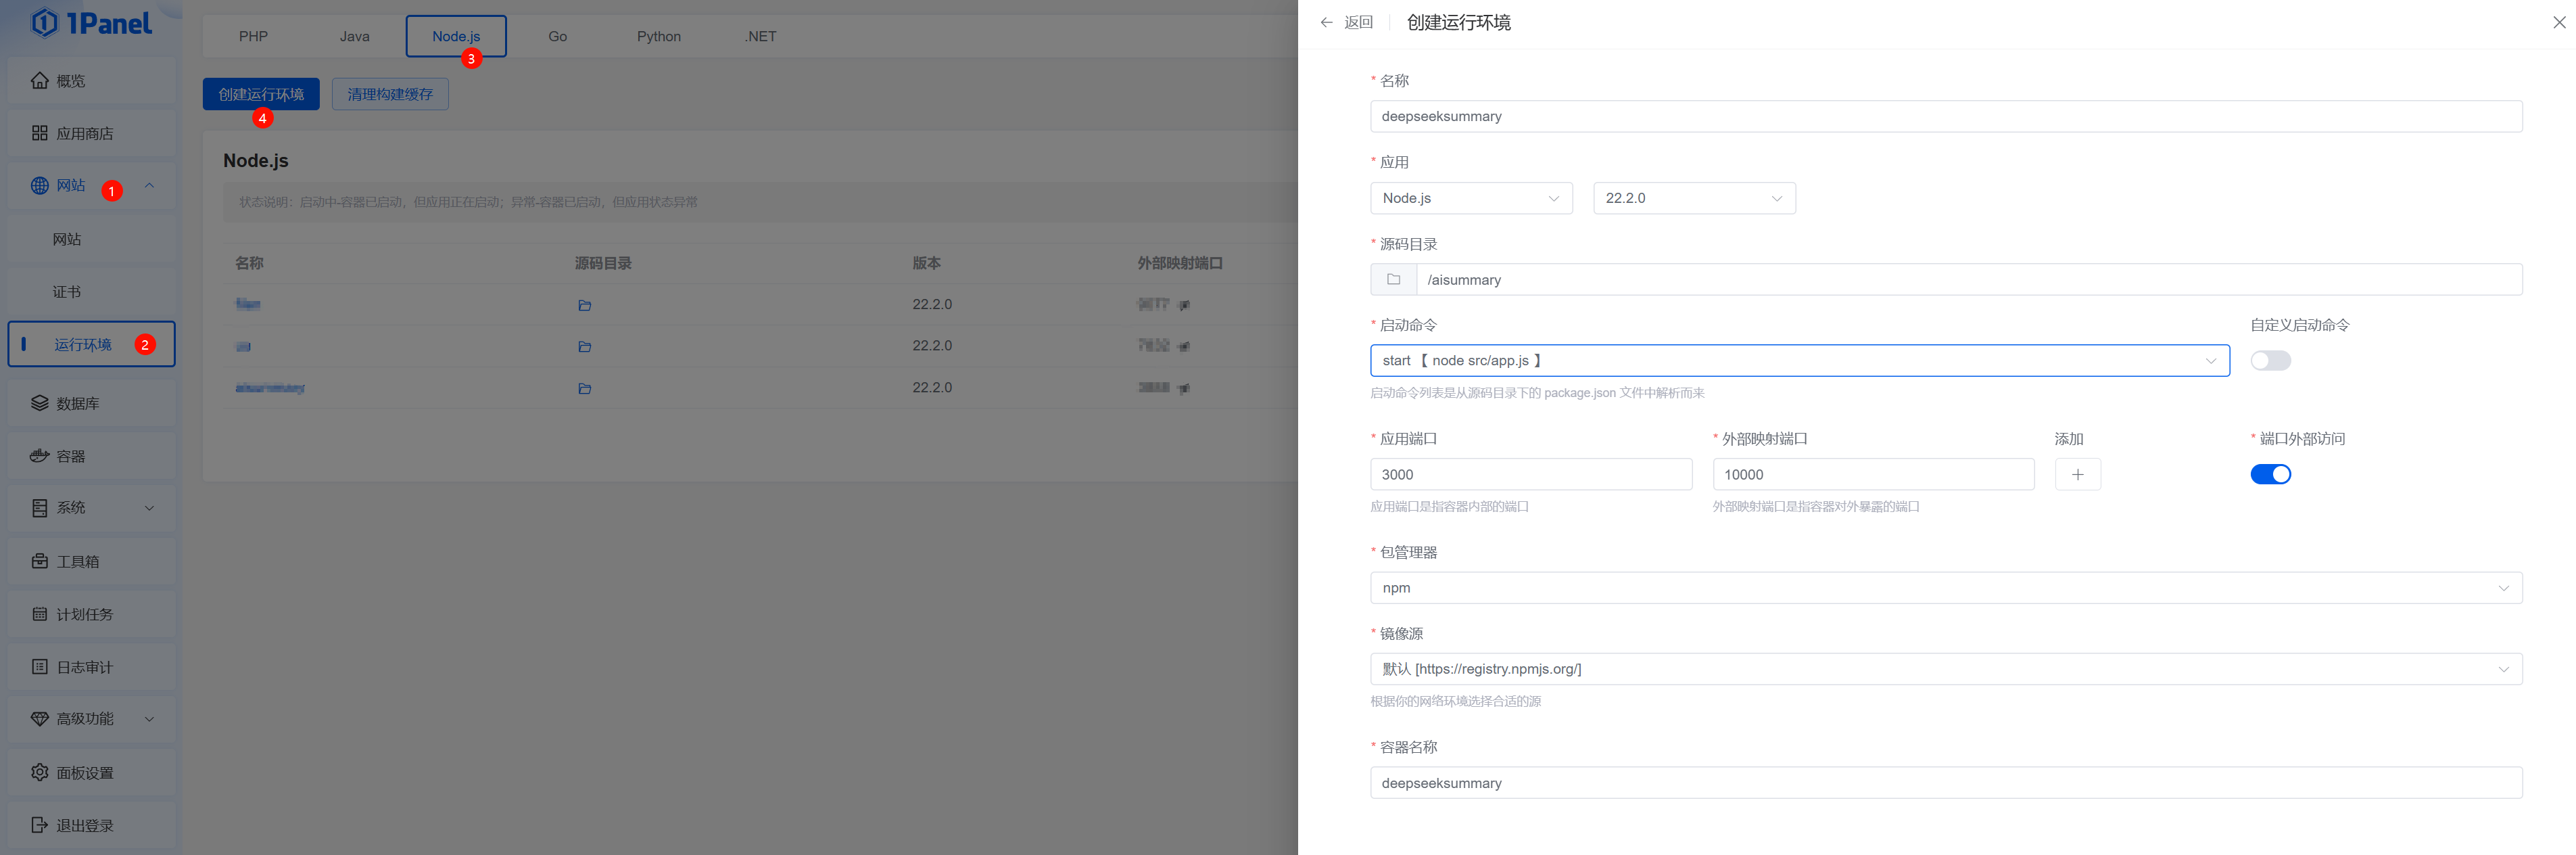
打开创建node js环境选项,在源码目录中选择node js代码所在的目录,然后1panel就会自动生成启动命令。当然,如果你有额外需求也可以对命令进行自定义。同时下面也提供了端口映射选项,可以避免端口冲突。(怎么感觉好熟悉,这不还是docker那一套吗,果然万物皆可docker)
Comments